Not PS4 exclusive anymore
Briefing
 (or click here for the DEMO video)
It’s such a pity that Unity didn’t provide any out-of-the-box feature to get motion data for DualShock4 (unless you have the PS4 SDK), and you may have to write some low-level code to achieve that.
Since Unity released the new Input System (here’s the introduction), it becomes easier to access the data you want.
One of the most powerful features is that you can customize the input layout and access the hidden data.
Well, let’s get started.
Customize Layout
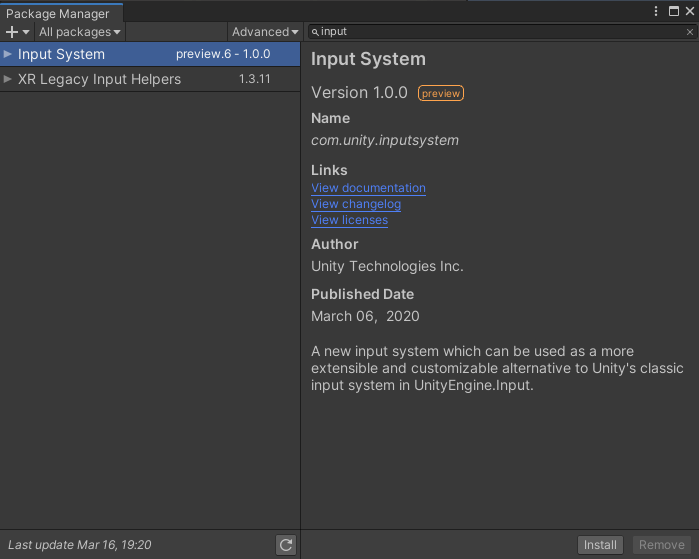
First you need to create a new project and install Input System from package manager.
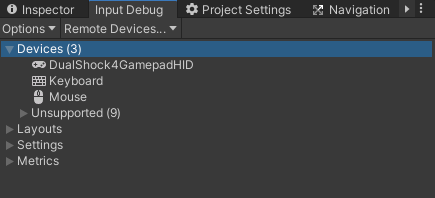
Open the debugger window(Window -> Analysis -> Input Debugger ) and connect your DualShock4 controller,
you should be able to see your controller in the Devices tab which named DualShock4GamepadHID.(If not, just restart Unity)
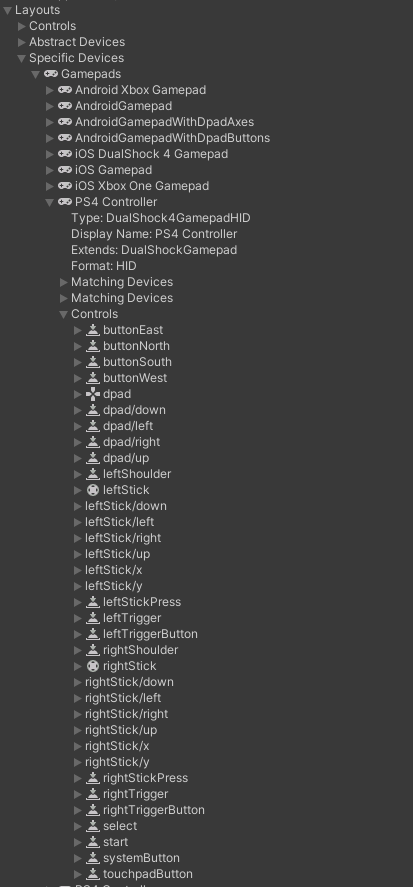
Click Input Debug -> Layouts -> Specific Devices -> Gamepads -> PS4 Controller -> Controls, you can see the default layout contains all the buttons, sticks, triggers and the D-Pad. All we need to do is to add new controls for the gyroscope and the accelerometer.
There’re 2 ways to create a custom layout, using struct or JSON. In this tutorial I’d like to use JSON for convenience.
First you gonna copy the default layout so that you don’t have to bind all the other buttons yourself.
Open Input Debug -> Layouts -> Specific Devices -> Gamepads -> PS4 Controller then right click, select Copy Layout as JSON and paste into a new JSON file created by yourself.
I suggest you modifying name and displayName so that it can be differed from the default one.
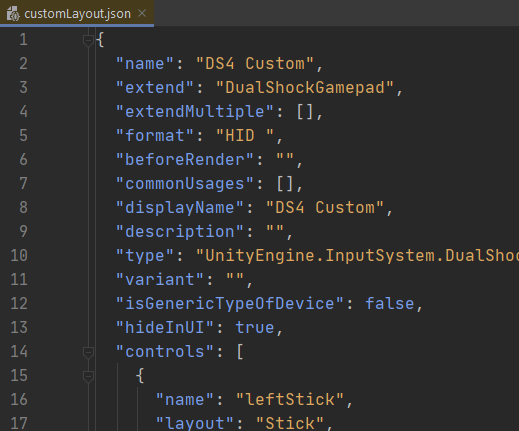
Go through every item under control, and referring to the report structure provided by eleccelerator wiki, the customized controls should look like this.
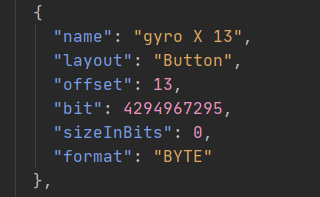
Well, some of you may be confused that why the layout field should be Button rather than something like Axis. In general a real button has only 2 status, released and pressed, representing 0 and 1 as value.
For an axis, it should be a 1D vector ranged from -1 to 1, or 0 to 1.
Well, if you look into the default layout you could see that in fact there is no basic layout called axis. For instance the Stick layout for your L and R stick, which can return an 2D vector, is actually a combination of 4 Button layout.
What actually differs a real button from an real axis is the format field. A real button’s format should be BIT while an axis is BYTE.
The data returned from a stick and a gyroscope should be similar, the only difference is that a gyroscope has one more axis. So, for every axis of the gyroscope or the accelerometer, just copy a button layout under L or R stick, delete unused fields, modify the offset, and that’s it.
There’re totally 6 axis for 2 sensors, and if you’ve read the report structure I mentioned, you’ll know that there’re 2 possible offsets for every axis. For convenience I add all 12 offsets(from 13 to 24) at once and decide which to user later.
Obtain Data
First you need a C# script to overwrite the default layout of DualShock4.
//DS4.cs
using System.IO;
using UnityEngine;
using UnityEngine.InputSystem;
using UnityEngine.InputSystem.Controls;

public class DS4
{
    public static Gamepad controller = null;

    public static Gamepad getConroller(string layoutFile = null)
    {
        // Read layout from JSON file
        string layout = File.ReadAllText(layoutFile == null ? "Assets/Script/customLayout.json" : layoutFile);

        // Overwrite the default layout
        InputSystem.RegisterLayoutOverride(layout, "DualShock4GamepadHID");

        var ds4 = Gamepad.current;
        DS4.controller = ds4;
        return ds4;
    }
}
Call DS4.getController() and the layout in customLayout.json will be read and applied to your current controller.
To test if the Input System works correctly, let’s create a cube object and attach a script to it.
//InputTest.cs
using System.Collections;
using System.Collections.Generic;
using UnityEngine;
using UnityEngine.InputSystem;

public class InputTest : MonoBehaviour
{
    Gamepad controller;
    void Start()
    {
        this.controller = DS4.getConroller();
    }
}
Run your program and double click DualShock4GamepadHID. In the new windows you should be able to see all the new controls from offset 13 to 24 and the values changing when you rotate your controller in the real world.

Demo
In the previous step you get the readings from the 2 sensors, now I’m gonna show you a demo for how to deal with the data, let’s take the gyroscope(offset 13 to 18) for example.
Since the data of every axis of the gyroscope may be located in 2 different offsets, when the controller is still, I could read stable readings from offset 14, 16, 18 while the other 3 keep flickering(), so I would choose 14, 16 and 18 as the input data. Since I don’t have any official documentation from Sony, by the time I wrote this I couldn’t figure out what the data of 3 other offset actually means(UPDATE: it should be the unfiltered raw data). Analyze the data and I got these features for every axis’s data:
- The value ranged from 0 to 1.
- 0 or 1 means still, 0.5 to 1 means rotating forward and 0 to 0.5 means rotating backwards.
- The value becomes closer to 0.5 if the controller is rotating faster(no matter forward or backwards).
Modify DS4.cs, notice that DualShock4 uses different coordinate from Unity so the data of Z axis should multiply by -1.
//DS4.cs
using System.IO;
using UnityEngine;
using UnityEngine.InputSystem;
using UnityEngine.InputSystem.Controls;

public class DS4
{
    // Gyroscope
    public static ButtonControl gyroX = null;
    public static ButtonControl gyroY = null;
    public static ButtonControl gyroZ = null;

    public static Gamepad controller = null;

    public static Gamepad getConroller(string layoutFile = null)
    {
        // Read layout from JSON file
        string layout = File.ReadAllText(layoutFile == null ? "Assets/Script/customLayout.json" : layoutFile);

        // Overwrite the default layout
        InputSystem.RegisterLayoutOverride(layout, "DualShock4GamepadHID");

        var ds4 = Gamepad.current;
        DS4.controller = ds4;
        bindControls(DS4.controller);
        return DS4.controller;
    }

    private static void bindControls(Gamepad ds4)
    {
        gyroX = ds4.GetChildControl<ButtonControl>("gyro X 14");
        gyroY = ds4.GetChildControl<ButtonControl>("gyro Y 16");
        gyroZ = ds4.GetChildControl<ButtonControl>("gyro Z 18");
    }

    public static Quaternion getRotation(float scale = 1)
    {
        float x = processRawData(gyroX.ReadValue()) * scale;
        float y = processRawData(gyroY.ReadValue()) * scale;
        float z = -processRawData(gyroZ.ReadValue()) * scale;
        return Quaternion.Euler(x, y, z);
    }

    private static float processRawData(float data)
    {
        return data > 0.5 ? 1 - data : -data;
    }
}
Call getRotation() in your code and you can get the rotation speed of your controller represented in a quaternion.
Modify InputTest.cs as well, so that the cube can rotate as the controller does.
//InputTest.cs
using System;
using UnityEngine;
using UnityEngine.InputSystem;

public class InputTest : MonoBehaviour
{
    private Gamepad controller = null;
    private Transform m_transform;

    void Start()
    {
        this.controller = DS4.getConroller();
        m_transform = this.transform;
    }

    void Update()
    {
        if (controller == null)
        {
            try
            {
                controller = DS4.getConroller();
            }
            catch (Exception e)
            {
                Console.WriteLine(e);
            }
        }
        else
        {
            // Press circle button to reset rotation
            if (controller.buttonEast.isPressed)
            {
                m_transform.rotation = Quaternion.identity;
            }
            m_transform.rotation *= DS4.getRotation(4000 * Time.deltaTime);
        }
    }
}
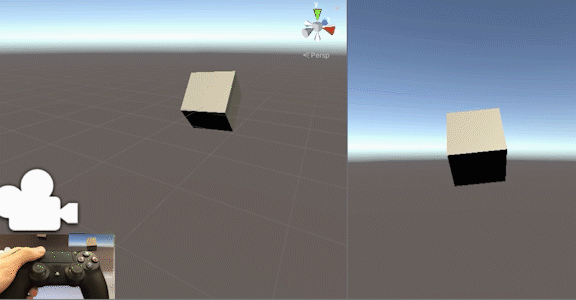
Now run your program and rotate your controller, you should be able to see your cube rotating just like the GIF the beginning of this tutorial shows.
You can get all the code in this tutorial from my
GitHub repo.
Thank you for reading this article and don’t forget to comment below if you find any mistake.
(Header photo by Alvaro Reyes on Unsplash)
Reference